
General
Discover the world around you
Ylore is a mobile platform that offers self-guided tours and points of interest, for those eager to explore and learn more about their world. With Ylore, you gain local insights and experiences, and so much more. Ylore is not just about tours; it’s about uncovering the hidden gems around you.
Product tour
Create and Share
Key functions of Ylore
Ylore features three key functions, each designed to enhance your travel experience.
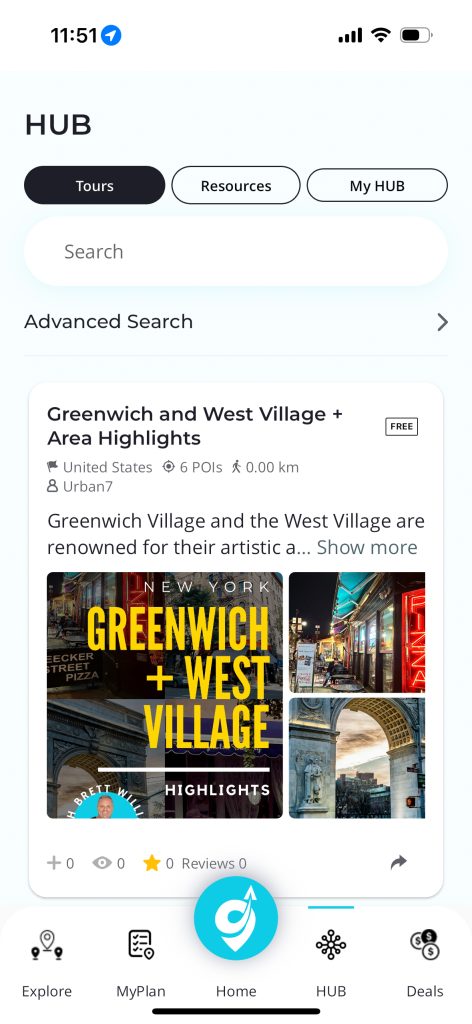
1 Tours
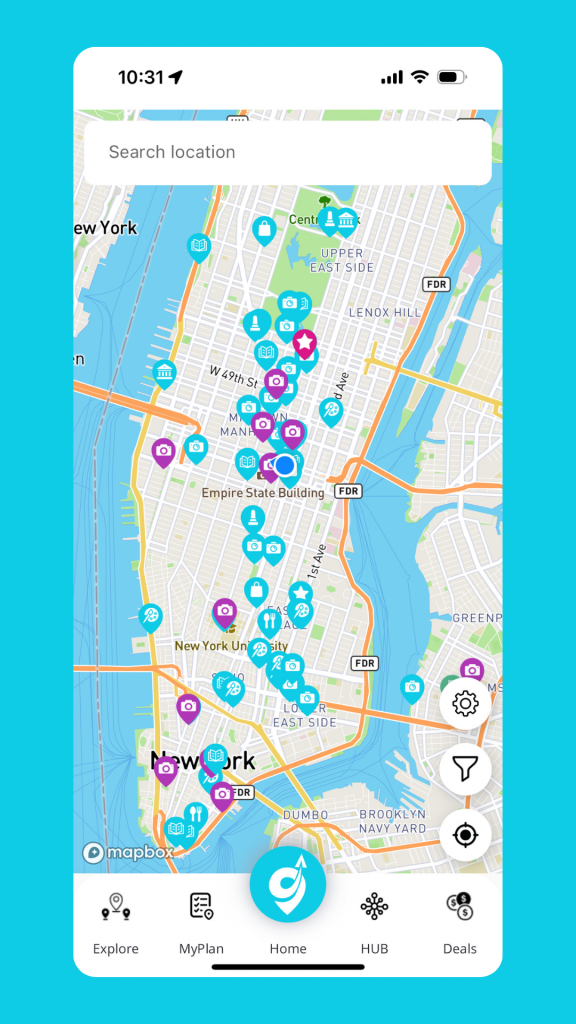
Tours are activities which involve multiple You can identify these on the Home Screen by the colored location pins.
Tours can be free, or premium (paid – coming soon) and provide in depth information about significant locations, landmarks, and attractions.
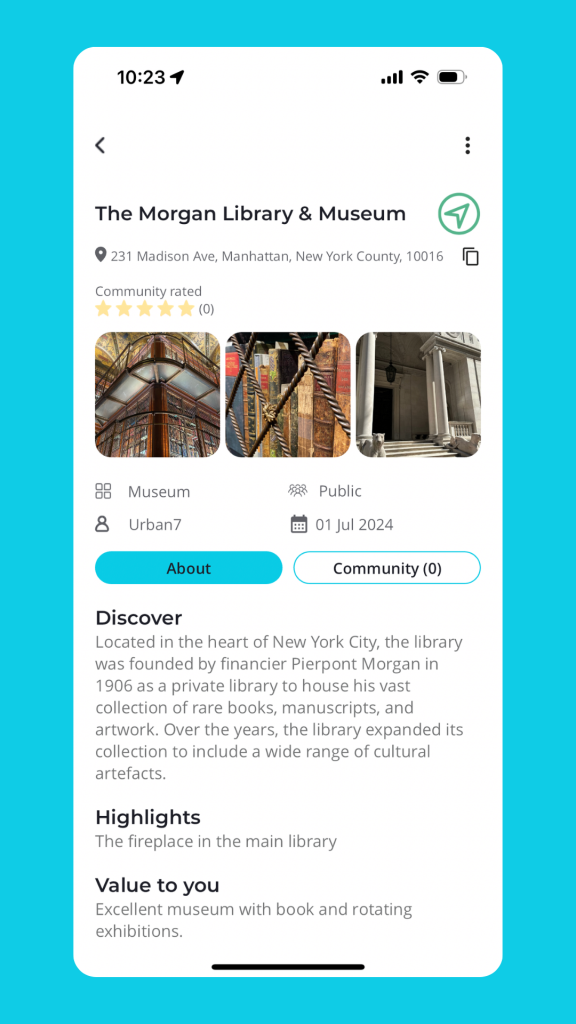
2 Points of Interest (POI)
Individual Points Of Interest are made for travelers. Find interesting POI around you.
They are crafted to spark your interest and inspire you to visit and experience it firsthand.
You can identify POI on the Home Screen by the aqua colored location markers
3 Itinerary
Designed to help you plan more efficiently, add the tours and POI you want to see.
Multimedia content experience
Discover a new way of traveling with our self-guided tours that offer more than just audio. Our immersive experience allows you to learn about different points of interest through various mediums, including:
- Text
- Video
- Photos
- External links
Language translation
Our tours can be displayed in your preferred language, but you may also choose to switch back to the original tour language. The choice is yours.
How the app works – Quick overview
As a user
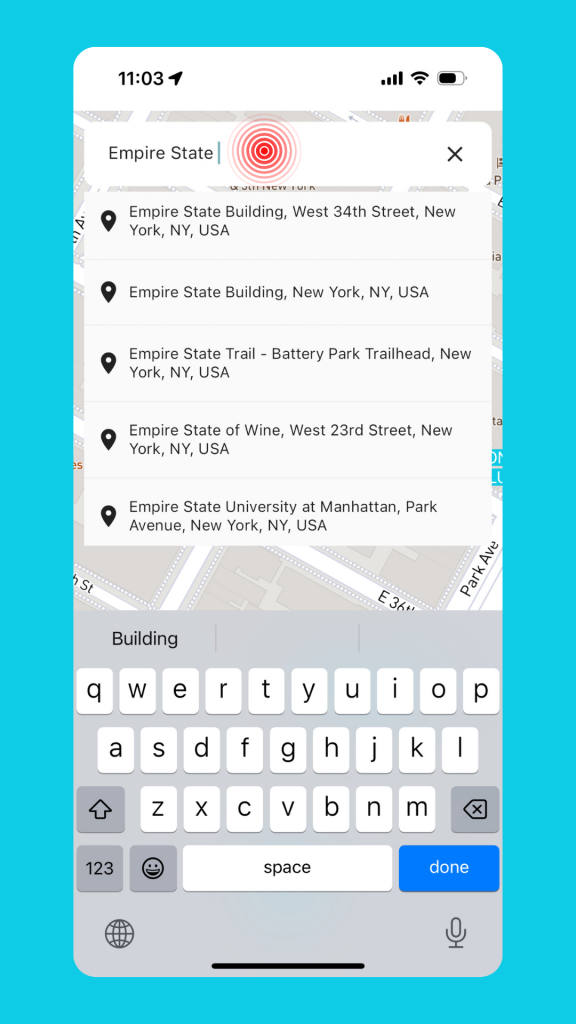
Search
There are three ways to find your next adventure:
- Go and search on the Home screen
- Search by location, where you want to view i.e. Boston, Empire State building
- Browse the HUB online store to purchase or add a free tour.
Home screen display
You can filter what tours you choose to display on the Home Screen. Select the filter a select only those you want to see.
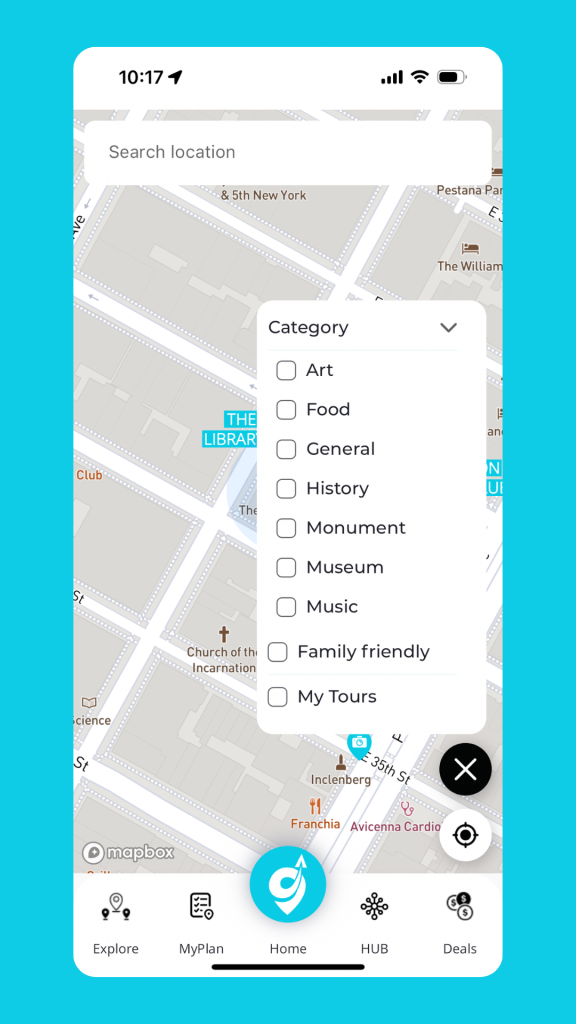
To select what Points Of Interest you want to display, go to:
- Settings
- Account
- Preferences
- Home Screen POI
AI powered Text to Speech
Tours only. Get AI powered natural sounding, Text-To-Speech with custom voice selection in any language.
Choose the voice that suits you.

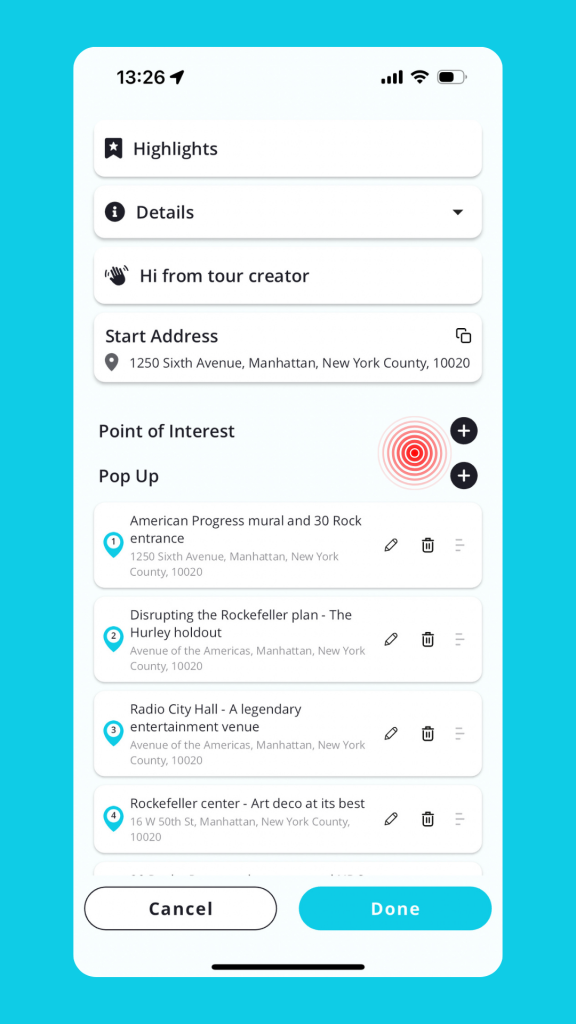
Adding a tour or POI to your list
Add using the [+] and it will be displayed in the Explore section.
Start/stop
To start a tour, select the play button. To stop a tour press the stop button. Easy.
Preview tour points
View images and summary for a location, to help you decide whether you want to re-order it or delete it. Simply select the side arrow on the tour point.
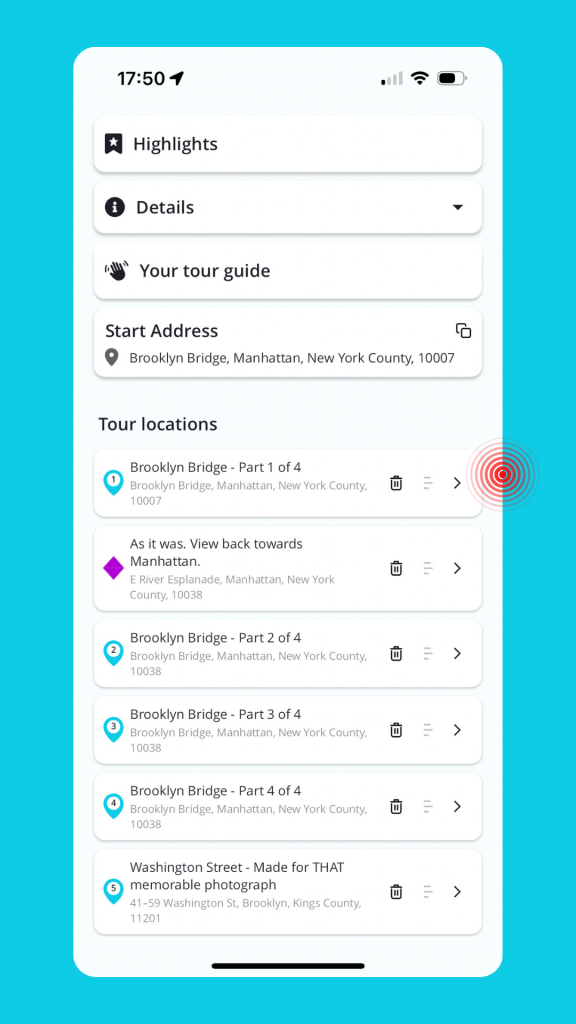
Reorder or delete POI
Long press a finger on the item in the tour list.
Drag and drop the item to the new position.
Numbering on the online map with automatically update, as will the start address of the tour if position number one has changed.
Deleting Points of Interest/Pop Ups
Select the [Delete] icon and select the relevant item in the tour list.
Reselect [Delete]
A confirmation prompt will appear.
Select [Okay]
As a creator
Create tours
Want to create a tour quickly? Follow these easy steps:
- Go to Explore
- Go to the Tours tab and create a tour by selecting [+]
- Populate the tour framework.
- Add and populate the content in your Points of Interest and Pop Ups. Keep your audience engaged and captivated with the inbuilt editor.
To enhance your audience’s understanding of the location, incorporate:
- Text
- Video
- Photographs
- External links
When you have added at least one POI or PU, select [Done] which is the equivalent of [Save].
If you do not select [Done] the POI’s and PUs will not be saved.
It is recommended to periodically select [Done] so the content is saved.
Engage your social media audience with an interactive tour
Take your social media followers on a journey with you. Create an engaging tour and include the link in your posts. Your followers can download the tour for free or for a fee and follow in your footsteps or recommendations, leading to a richer connection with your audience. Leverage your network to create the best experience possible for your followers.
Including external links
With our built-in content editor, you can easily add external links to your content. This enables people to select and review your recommendations, making it a great tool for those participating in affiliate programs.
Ease of use
Ylore has been designed to be easily understood and utilized by a 10-year-old, ensuring simplicity in its purpose and usage.
Social logins
Make account creation easy. Use Apple or Google logins to create an account in seconds.
Value to you
Enhance your understanding of the world around you by delving into the local community, wherever you are.
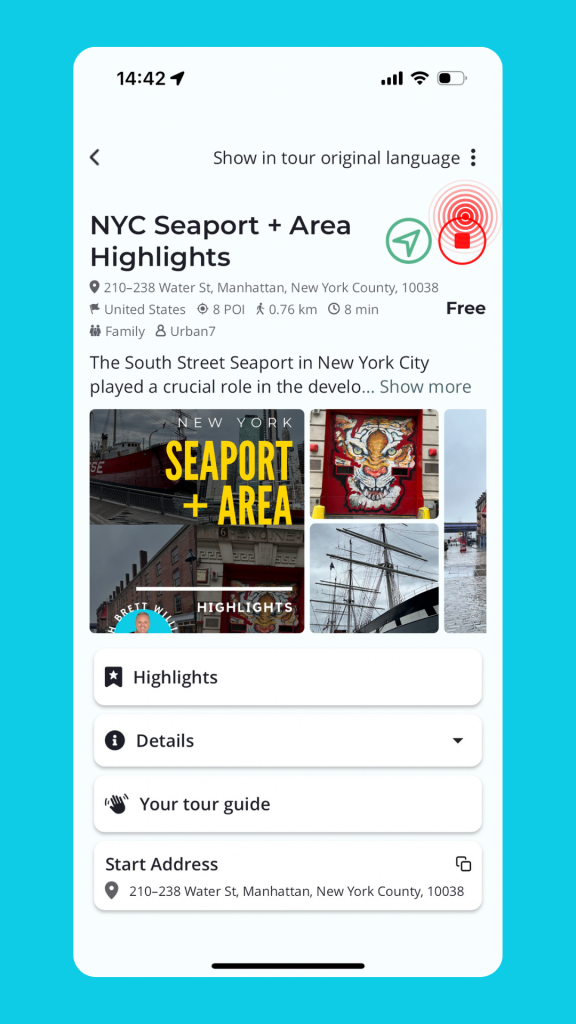
Tours
Key system rules
- When creating a tour and adding Points of Interest (POI) or Pop Ups (PU), you must select [Done] to save them. So it is recommended that you periodically select [Done] when creating a number of POIs.
- Every tour must have at least one POI or PU assigned for it to be published privately or publicly.
- Only tours you create, can be edited.
- To access content at a POI of PU, a user must be within 33ft (10m), inside the visible geo fence that surrounds it. Once inside the geo fence, the content is accessible.
Ylore structure
There are two levels to a our. Tour frames and tour points.
The tour frame. This tells you about the tour.
The tour points. This tells the story at a location. The content becomes available during an active tour and once a user enters the geo fence on the map.
That’s the Ylore difference, you have to have been there to access the content.
Viewing content without an account
People can download the app for free and browse tours or individual POI, without having to create an account.
To view, add or create a tour or POI, you will need an account.
IP protection
We believe in protecting creator’s hard work for tours listed for purchase. We have implemented a number of features that support this:
- Tour points are truncated, which means they can’t be seen.
- Fixed map preview. The map tiles are set at a higher level than standard, to protect the exact location of tour points. This has been done to prevent other people identifying the exact location
- A user cannot access content at a POI unless they are physically within the 33ft (10m) geo fence that surrounds a tour point.
- A user of a tour is unable to take screenshots of the content or copy content.
Tools for creators
Creating tours and intermeshing with your online profile has never been easier.
Your brand
You have a voice so let’s hear it! ‘Hi from tour creator’ is a feature that let’s people know who you are and your style. It provides for a welcoming introduction and enticement for people to add your tour to their list.
Affiliate links
Continue the conversation and embed affiliate links in your tours and Points of Interest.
We recommend to minimise these, as this action takes a user off platform and may serve as a distraction. Distractions or incomplete tours may impact your review ratings.
Social media
Add your social media links to your tours, so users can find out more about you.
Profile
Assign your creator name to tours for recognition. People might not know you as John Smith but they might know and search for ‘The Urban Explorer.’
External links
Embed external links in a tour to some of your online content, to help explain your story.
Resources
Go to the HUB and Resources tab to see tips on how to make your tour stand out from the pack.
Reviews
Reviews help build trust and credibility with your prospective audience.
Home screen
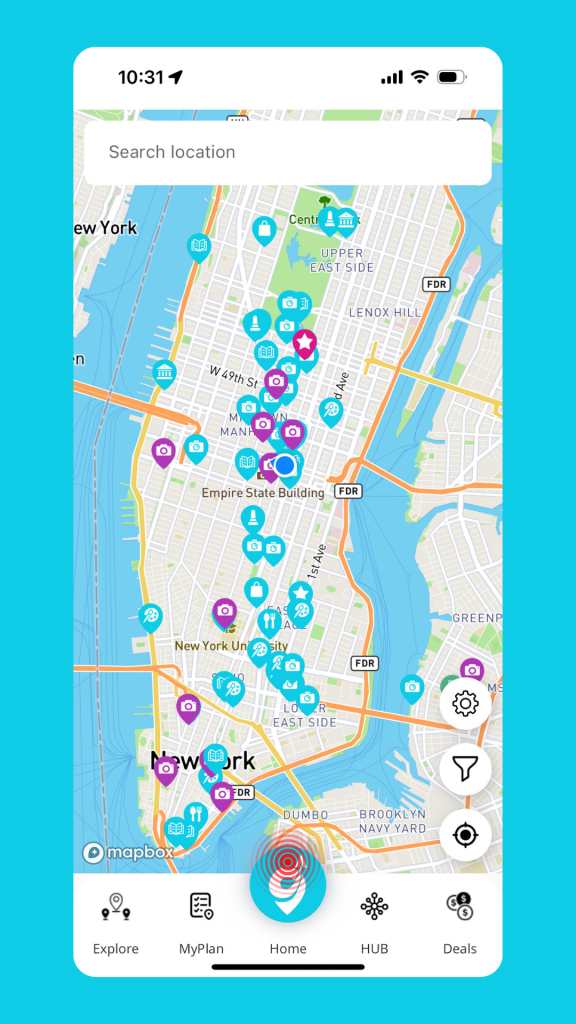
Select the Ylore icon at the bottom of the navigation menu. It will take you back to the Home screen.
Search
Search for tours on the home screen. Tours around you will be displayed.
Want to find tours at a different location i.e Rome, detail [Rome] in the search bar and view tours in Rome by category.
Filter out categories not in scope easily. Select the filter and select those tour categories of interest. These will then be displayed on the screen.
Use the filter to further narrow down the scope of tours visible. You can select:
- Tours you created
- Family friendly tours
Starting a tour
Press the play button on the tour.
Mode of travel
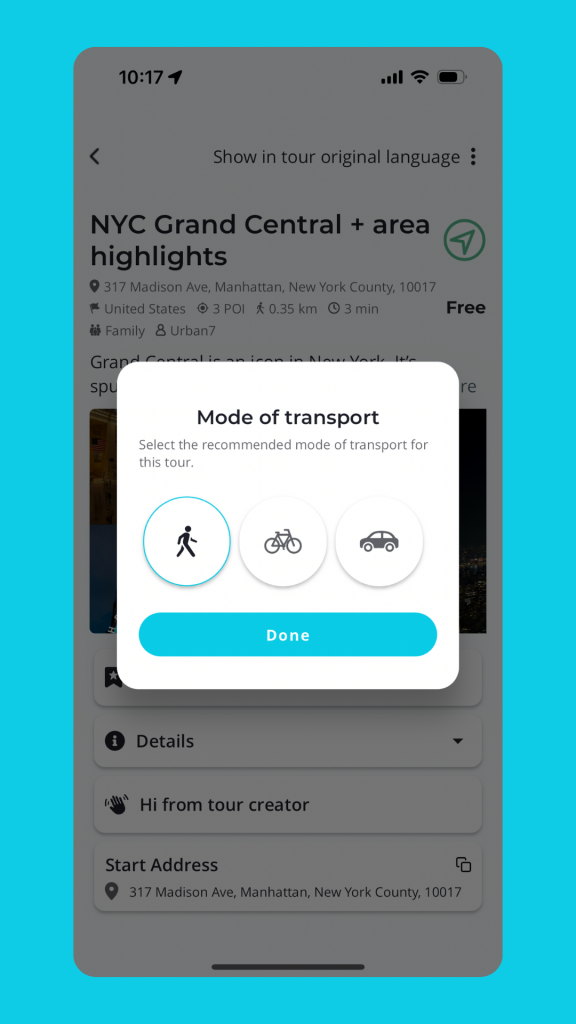
There are three modes of travel to select as a user, Walking, Cycling or Driving.
Ending a tour
Press the stop button on the tour. If you are only part way through a tour, you can restart the tour and delete those POI/Pop Ups that you have already been too. Then press the Play button.
Creating a tour

Select [Tours] on the navigation bar on the Home screen.
Select [+].
Follow the intuitive process to create a tour frame, then add Points of Interest.
Once Points of Interest (POI) or Pop Ups (PU) have been created, you must select [Done] which is the same as saving them. So it is recommended that you periodically select [Done] when creating a number of POIs.
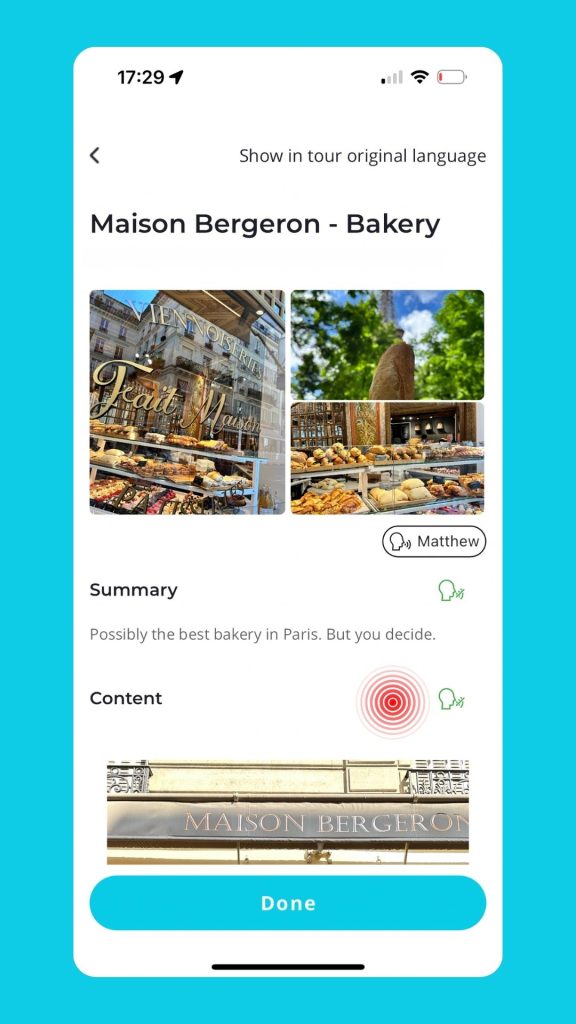
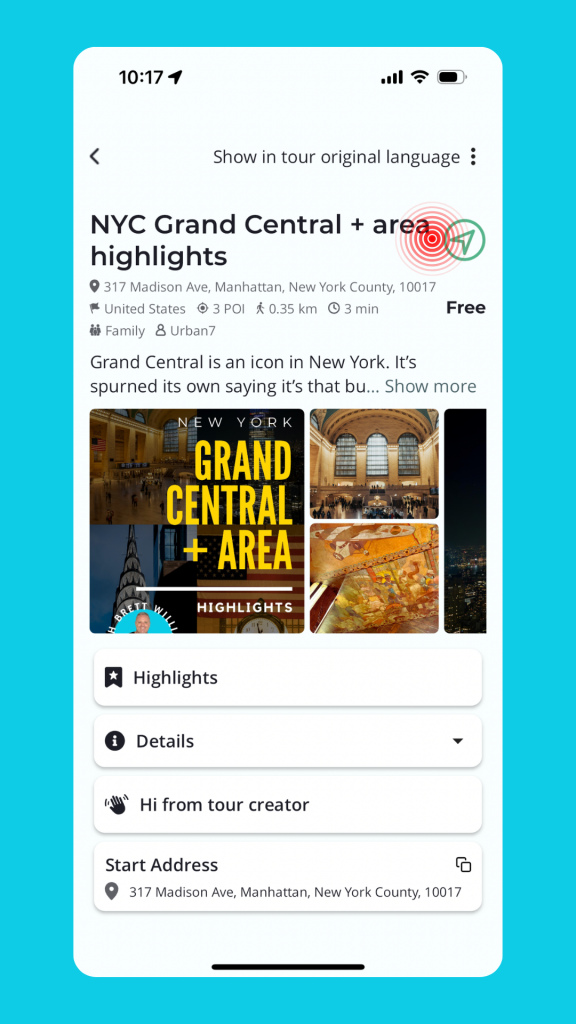
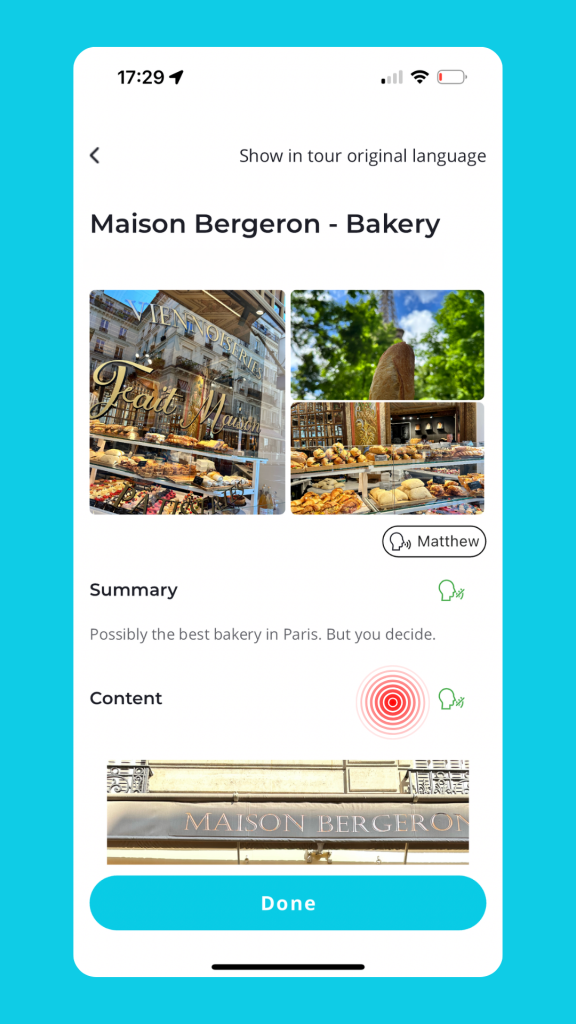
Purpose of images in tour previews
Preview images are designed to highlight a tour and provide a point of reference for a user on what to look for or what they will experience when they arrive at a Point of Interest or Pop Up.
Images don’t need to be lengthy, they are a reference only. Users will experience the locations themselves.
! Tip: It is recommended not to load long videos into the app as it may affect performance and create a burden for a user if they have to download to tour and view offline. Our recommendation is that if you have to load videos, keep them short at five to 10 seconds and medium quality.
Auto sizing Photos and Videos
Images are treated against a cropping tool. The preferred frame is portrait. In Previews the image will be partly displayed due to size. On selection of the image, it is displayed as intended.
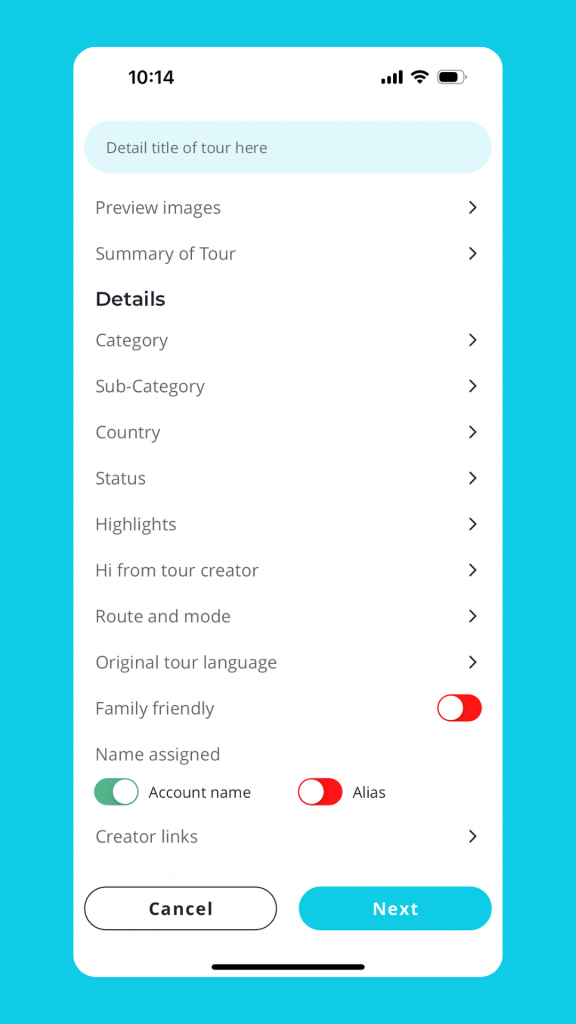
Tour details
The purpose of tour [Details] is multi point. It enables:
- A user to detail information about the tour
- Recommendations on how the tour should be conducted
- A creator to assign information that enables it to be located when searched for.
- The tour creator to introduce themselves. It’s their storytelling and personality that can make a tour shine.
Categories and subcategories
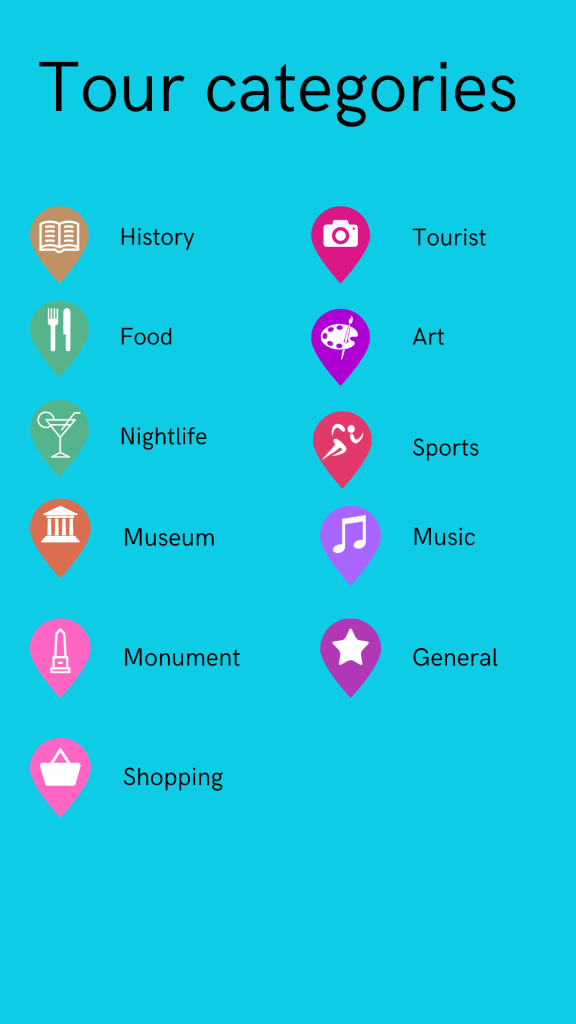
Assigning these elements enables a tour to be easily identified and searchable.
Different categories of tours can be seen visually on the home screen. Different categories of tour have a different color code.
Adding content to a tour, Point of Interest and Pop Up
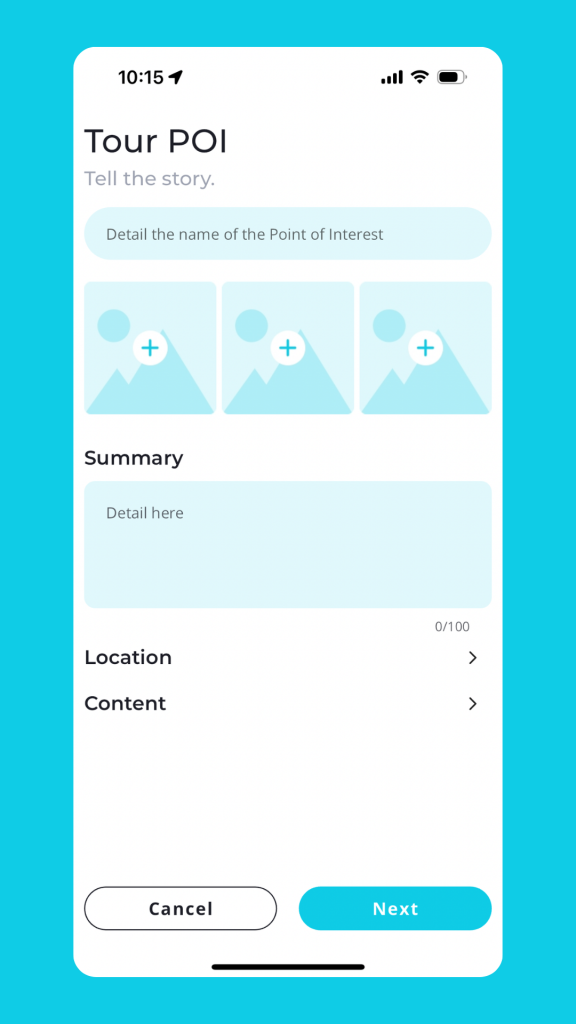
Ylore uses a drag/drop content editor. Create content fast by selecting the relevant multimedia icon. Text, video, external link, whatever you need. Shape the tour your way.
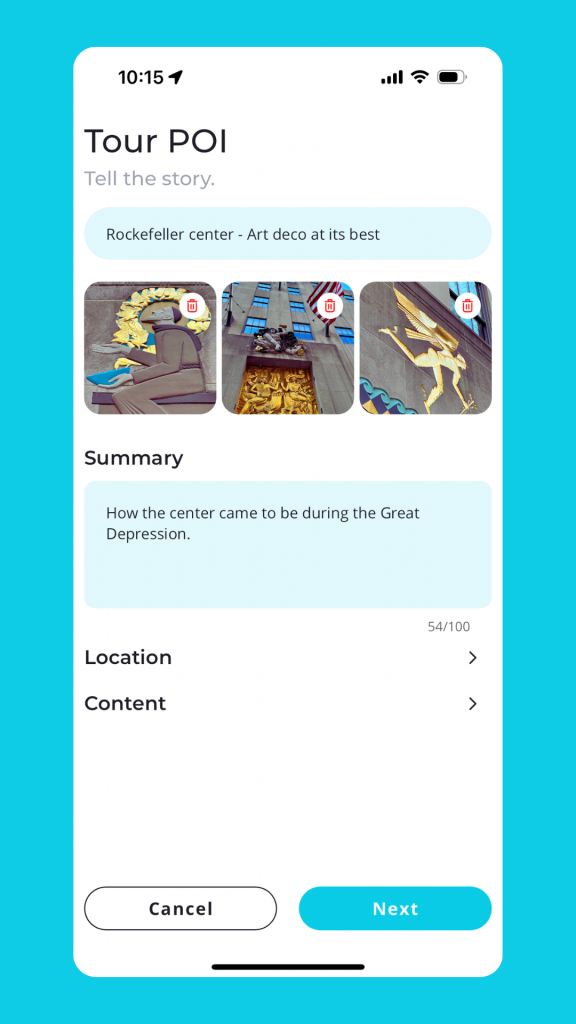
Content Editor in POI and PUs
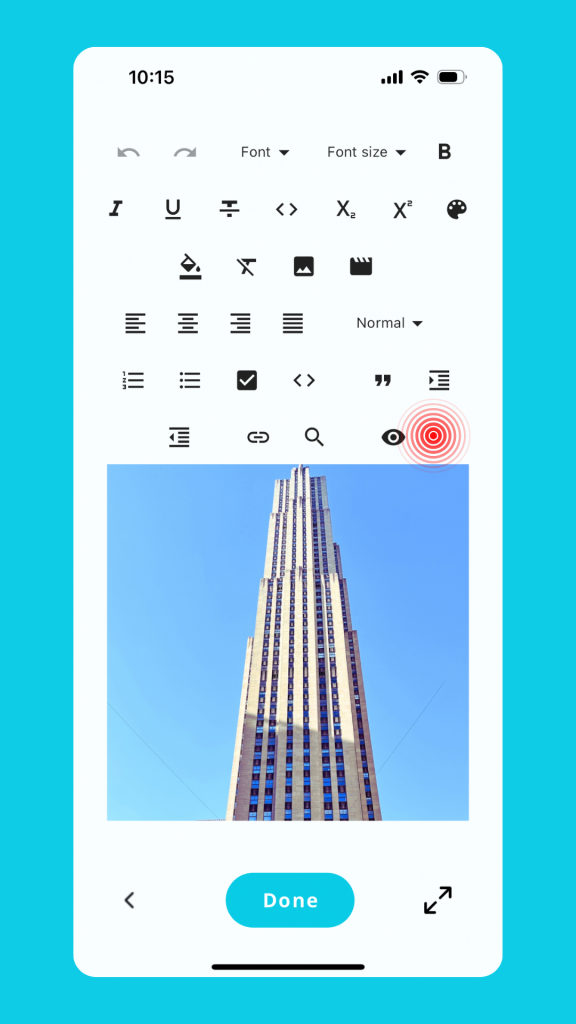
The content editor is used throughout the app, enabling creators to add content. It allows basic editing which is suited to mobile environments. A user can also preview content, so they can see how it would be viewed by a user.
A creator can add:
- Photos
- Videos
- External links
Hint: When adding photos or videos, make sure the cursor is focused on the line, not highlighting a line, otherwise the image will be placed at the bottom of the content.
Hint: Depending on the content, it may be easier to create text off platform, then simply copy/paste. This provides more opportunity for quality assurance and reduced error rates, leading to a better user experience.
Selecting a location manually on the phone screen
Long press your finger on the desired location. This means hold if for 1-2 seconds and the location marker will appear on screen.
Tip for manually adding a location
Place tour markers where you would expect people to be able to trigger the geo fence surrounding it.
Do’s
When manually selecting a location, ensure you zoom into the maximum, to ensure correct marker placement.
Don’ts
Place tour markers on roads or places which may subject a person to harm.
Place tour markers inside buildings where a user, on the outside, may not be able to trigger, even when using the ‘Force Geo Fence’ feature icon.
Editing a tour
Only the creator of a tour can edit a tour. In other words, you can edit tours you created, but no one else’s.
Deleting a tour and contents
In [Your Tours] select the [Delete] icon
Check the box of the tour you want to delete.
Re-select the [Delete] icon again
A confirmation prompt will appear.
Select [Okay]
The tour will be deleted.
Status
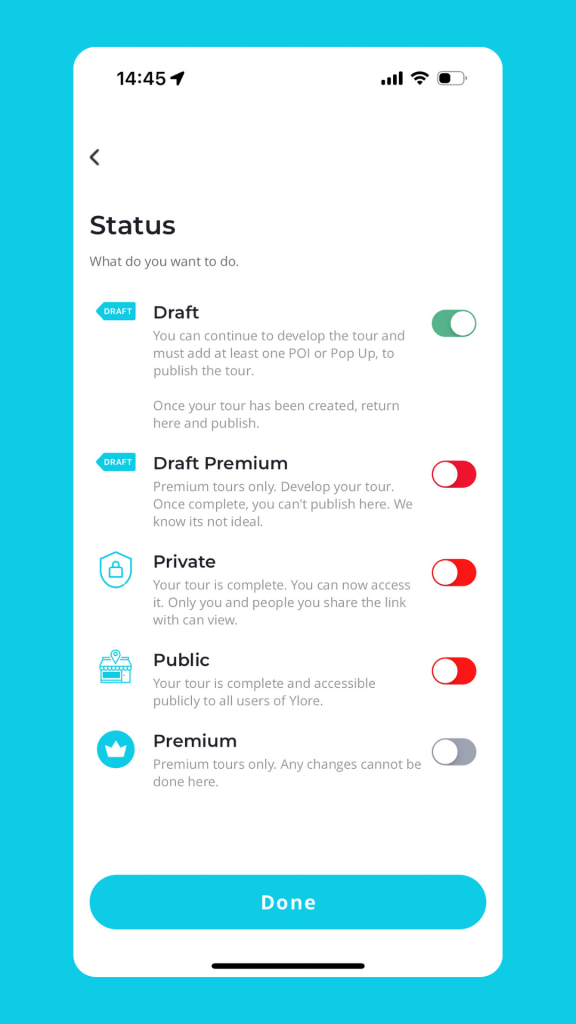
When creating a new tour, by default the tour will be assigned the status of DRAFT. This means:
- It cannot be shared privately
- Published to the online hub store.
- It is not displayed on your Home screen
Why? Because it’s not complete.
Once you have created at least one Point of Interest or Pop Up and assigned to a tour, you select [Done].
You will then be prompted to assign a status.
- Draft
You are continuing to develop the content and will only be visible to you
- Private
You are publishing the tour privately and only people who you share the link with can access the tour.
- Public
You are publishing the tour publicly to the online Hub store. You will be asked to assign it as FREE. You can change the status of a tour at any time.
Premium tours can be created on the app but they cannot be published from the app. We know, it’s not ideal.
Downloading a tour
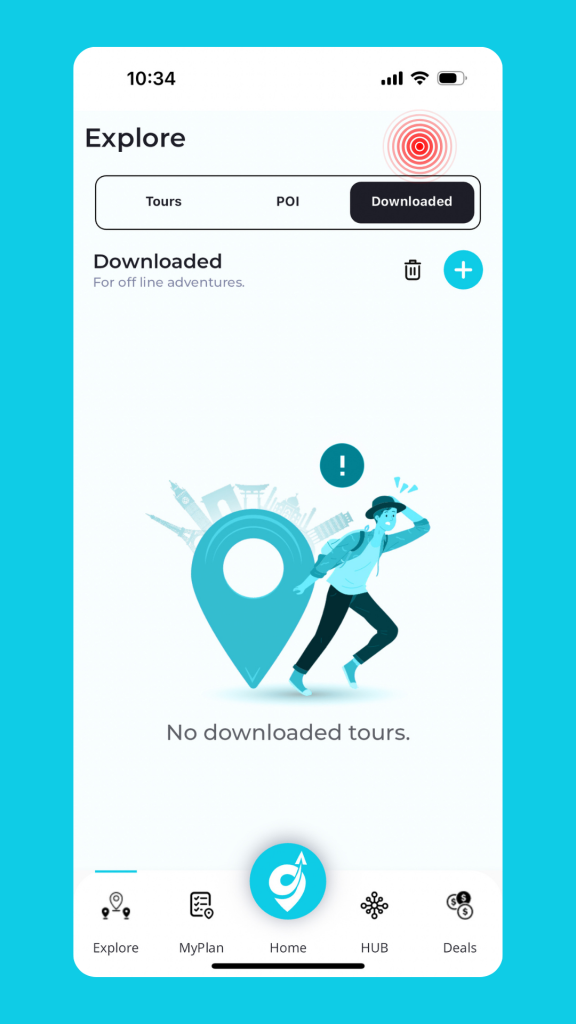
You can still use a tour when there is no network connection, however you must download.
Example. You are traveling internationally and turn off your global network roaming on your phone as you do not want to incur additional fees.
- At the hotel, select the tour you want.
- In the top right hand corner are the three vertical dots.
- Select the [Download] link
- A prompt will display advising that the size of the tour may be large and fees may be incurred from your phone network provider.
- If you agree, select [Okay]
- In Tours, the tour will appear in the [Downloads] tab.
The tour can be started at anytime. The only difference between a downloaded tour and a network connected tour, is the optimal route, time and distance between points does not display. This feature relies on internet connection.
Viewing a tour as a creator or user
If you have created a tour, on selection from the Your Tours list, you have the option to view the tour as a creator and make updates, or as a user, so you can see how it views on the screen.
Tours
The start of a tour
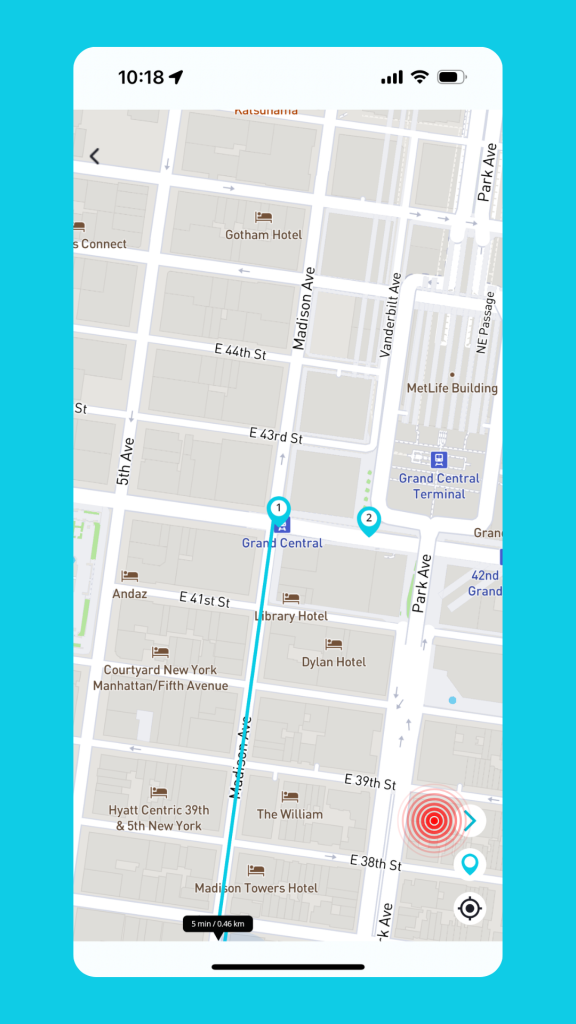
The first tour POI or Pop Up marks the start of the tour as developed by the tour creator.
On adding or purchasing the tour, once you start the tour, all the POI and Pop Ups are displayed on a map.
You can adjust the position of the POI’s or delete ones that are not of interest to you. Long press the tour points and reorder.
Your tours
Tours you create or select from the online HUB store will appear in [ Tours]. Referencing the icons, you can view at a glance the status of a tour
Tour visibility
Tours need to be published, either privately or publicly. Those tours in draft status will not be displayed.
Text to Speech
There is an icon, which on selection enable you to listen to spoken text. To stop the narrative, re-select the speech icon.
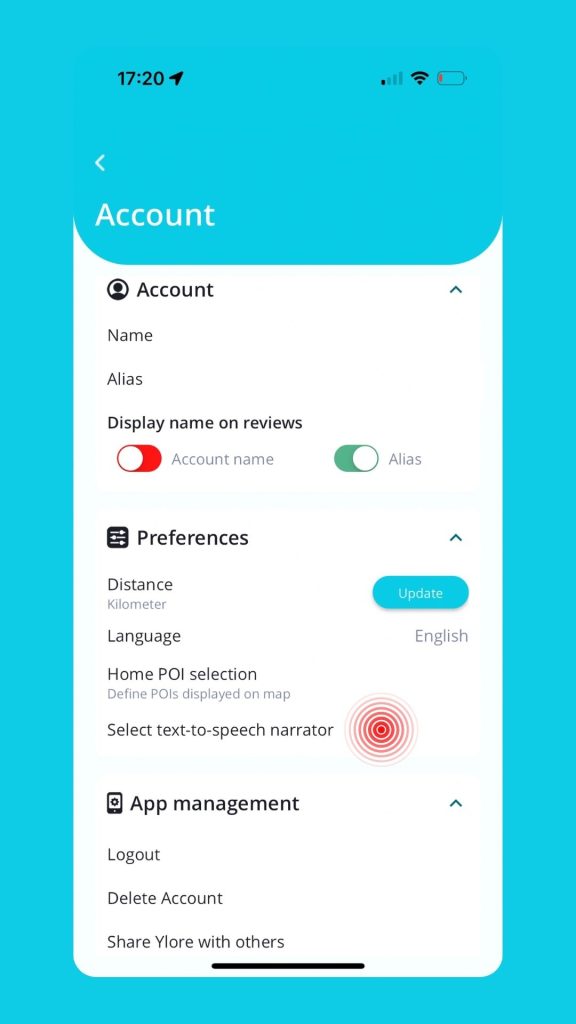
Setting AI speaker preference

You can select the narrator for you. Go to Settings–>Account
Select the Preferences sections
Select text to speech narrator
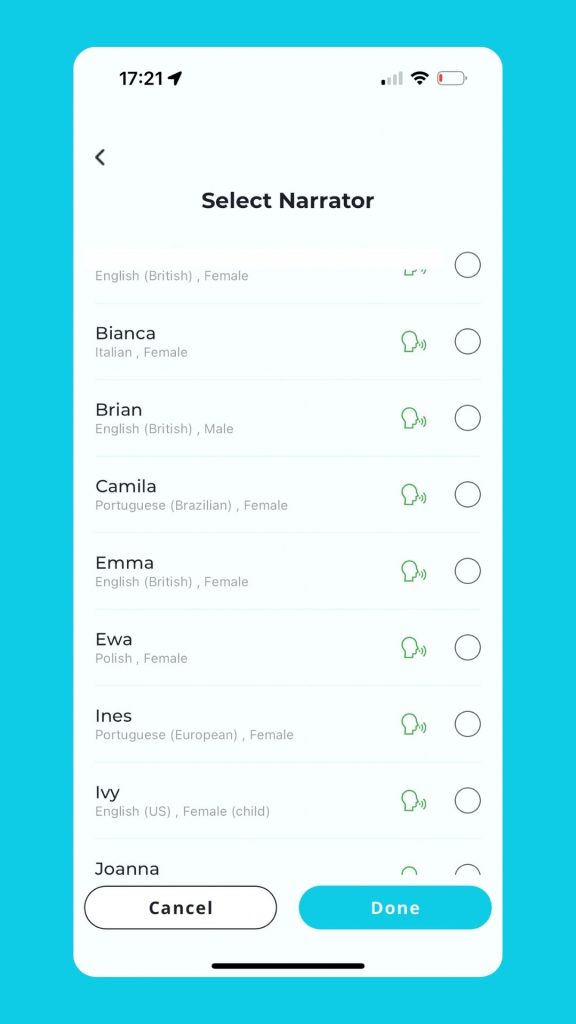
You can now select a natural sounding narrator to help tell you the story at a tour location.
Select the icon to hear a test sample.
Sharing a tour or POI with others

Ylore was built to share. As person A, select the three vertical dots in the upper right hand corner. Select [Copy link] and paste it in the message platform of your choice.
Person B receives the link, selects. If they already have Ylore installed, the tour will open up and Person B can review. If they want to add the tour to their list, select [+].
If Person B does not have Ylore installed, on selection they will be prompted to download the app. Re-select the link and it will take them to the tour.
Taking a tour
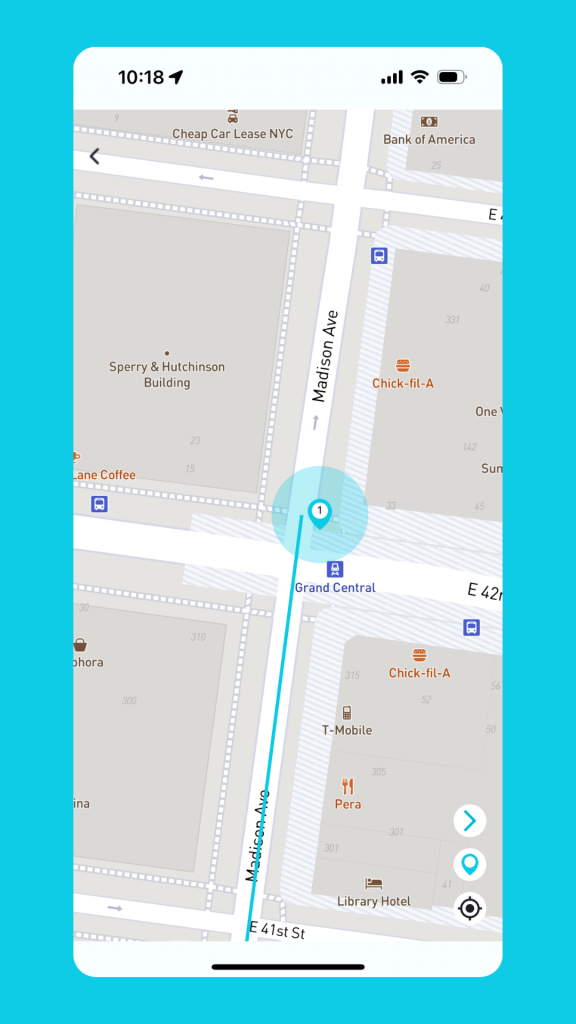
Once a tour starts, the user is directed to the first tour point.
Geo fence
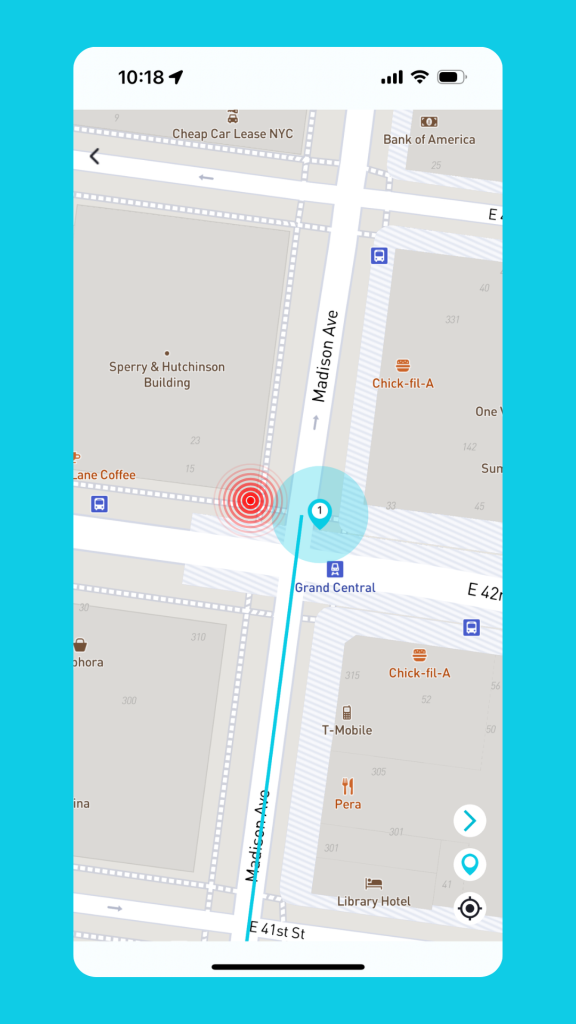
To activate tour content, a user must enter through the colored circle around a tour point, known as a geo fence.
Low GPS signal accuracy
On occasion, due to environmental issues such as being indoors, or surround by tall buildings, the mobile phone signal gets low accuracy. This means your position on the map may not be displayed accurately, and not where you expect it to be.
Select the Force Geo Fence icon, and if you are within 1,000ft (305m) of the tour marker, the content will display.
Reordering tour points mid tour
Life changes. You run out of time and may need to reorder tour points or delete those you don’t have time to see.
Select the back arrow on the map.
Reorder the tour markers and/or delete any that you have previously attended.
Select Play.
HUB
Search
Search for and locate tours nearby or if you’re traveling, at the new location. Conduct a simple or advanced search.
Find out more about a tour
Find out more about a tour, assess its popularity and what users are saying in the feedback section.
Tour metrics
Summary metrics enable a person to find out more about the popularity of a tour. They can see:
- How many times a tour has been viewed
- How many times it has been added to people’s tour list
- Review rating
- Tour feedback
Resources
Find resources that help you:
- Design engaging tours
- Improve your creator skill set
Tour metrics
This section is under development. Once released, you will be able to view the metrics about tours you have created, for free and listed for purchase.
User experience
Poor tour experience
If you have an experience with a tour that does not meet your expectations, tell us at hello@yloretravel.com and tell us specificity was the issue(s).
Content filtering and reporting
Ylore uses a number of different methodologies to help keep online interaction safe.
- We use content filtering to reject unwanted content that people may want to post.
- There are multiple points throughout a tour and the app, where a person can report content they identify as inappropriate. Look for the report icon and click through the process.
We investigate each report. As per our Terms of Service, it is at the sole discretion of AEGIS 24/7 what content is appropriate or inappropriate, balancing legal, moral and cultural issues.
Individual Points Of Interest (POI)
Purpose
Individual Points Of Interest are made for travelers. They are crafted to spark your interest and inspire you to visit and experience it firsthand.
Each POI has three images. Pick the best ones that tell the story.
Identifying POI
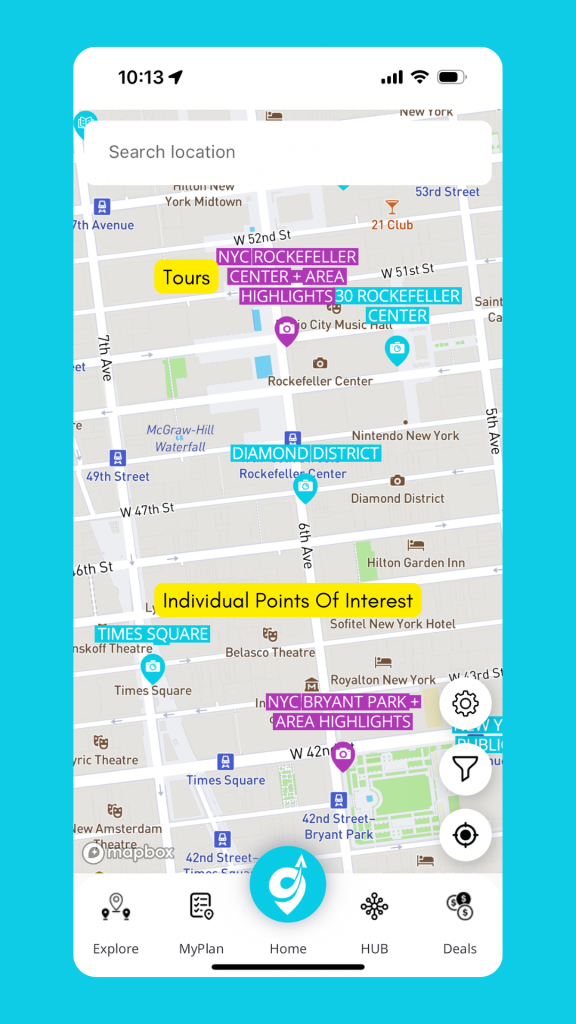
You can identify POI on the Home Screen by the aqua colored location markers.
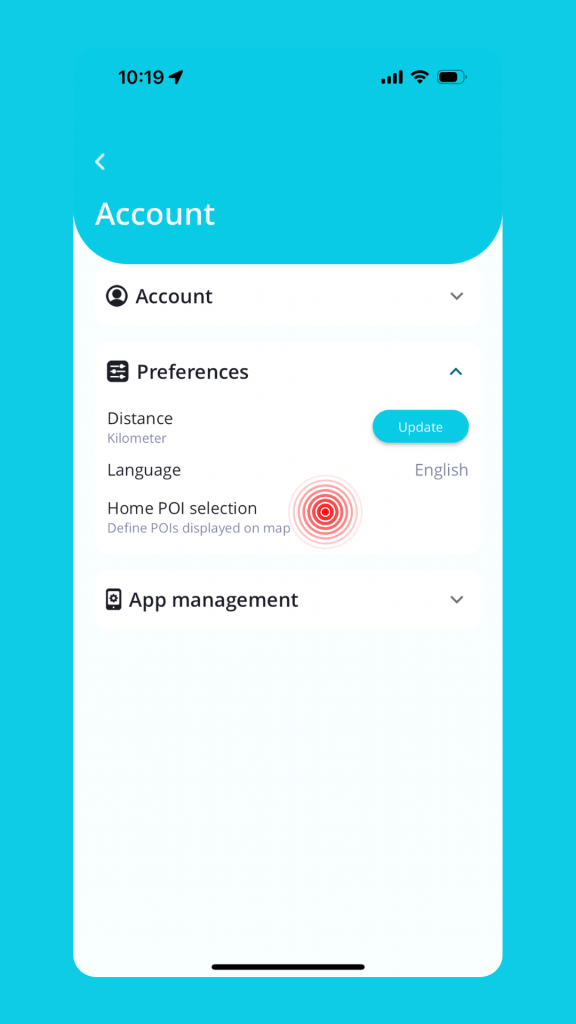
Displaying POIs of interest to you
You can choose to display all, or selected POI on the home screen i.e. you only want to see POI on History.
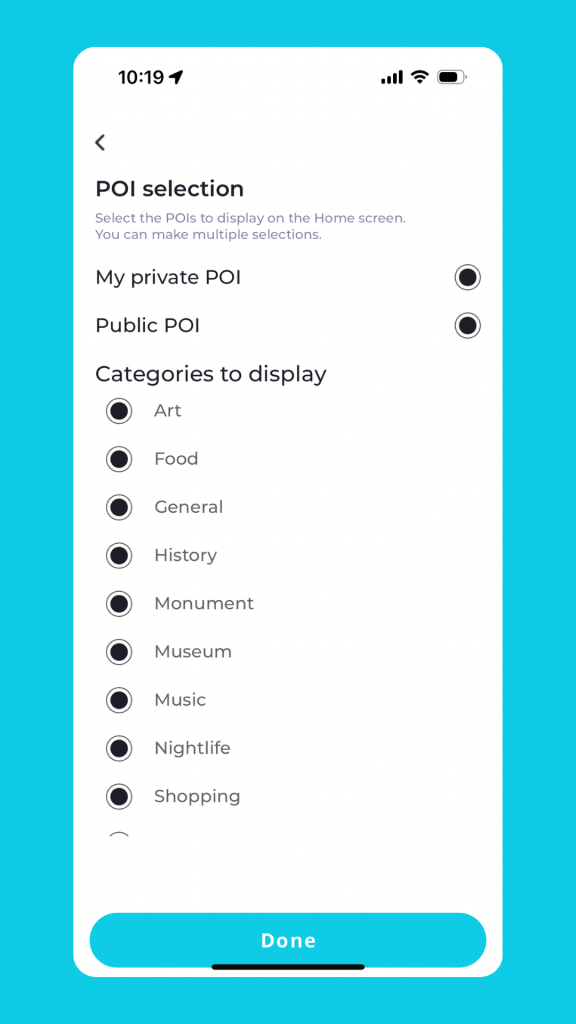
Go to Settings:
- Account
- Preferences
- Home Screen POI
- Uncheck the POI you do not wish to display.
POI features
When navigating to a POI, there may be times when the location accuracy on your mobile phone is affected by the environment. This includes scenarios such as indoors, tall buildings and buildings with glass on the facade. This is outside the scope of Ylore.
You can select the ‘Force Geo Fence’ icon which allows you to ‘force’ you location into the colored geo fence around a POI. This then triggers the content.
Creating a POI
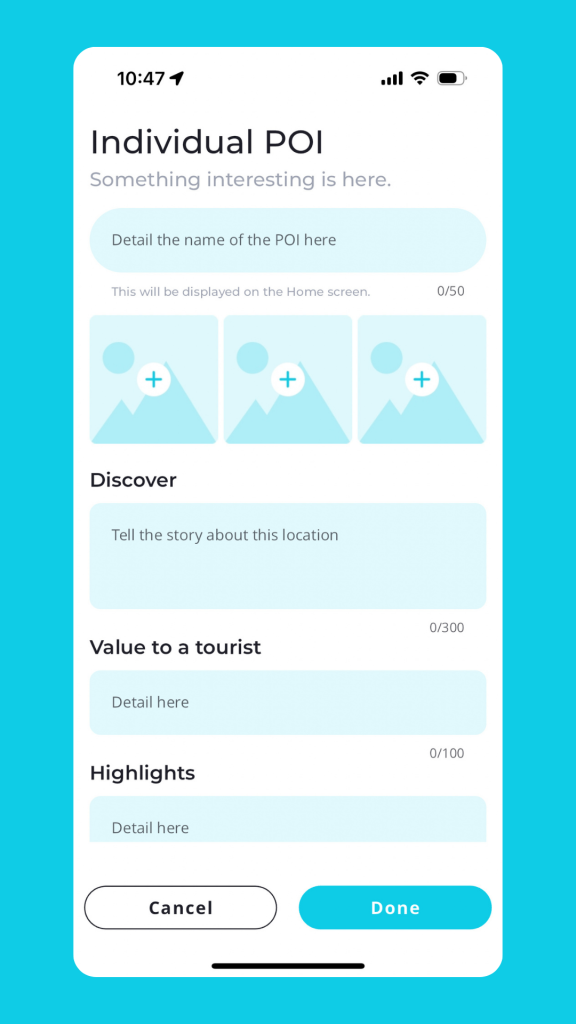
POIs are designed using a template to ensure focused content, making it clear to travelers what they can expect and benefit from.
POIs are designed using a template to ensure focused content, making it clear to travelers what they can expect and benefit from.
To prevent overcrowding, multiple individual POI cannot be listed at the same address.
For non address locations i.e open forest, there must be a distance of 100ft/30m between POI. You will not be able to save individual POI closer than 100ft/30m between each other.
Share a POI
You can share a POI by selecting the three vertical dots and copying the link.
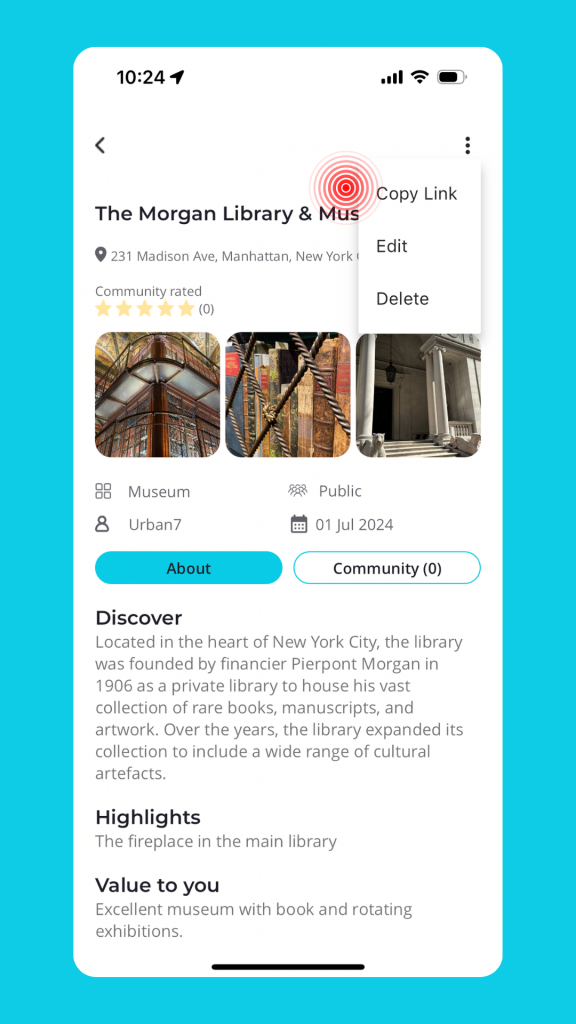
Delete a POI
Only a creator who has posted a POI can delete it. A creator cannot delete it once it has been ‘Rated and updated’ by another user. It means someone else in the community is now invested in the POI.
A creator can Edit a POI at any time, even after it has been ‘Rated and updated.’
Rate and update a POI
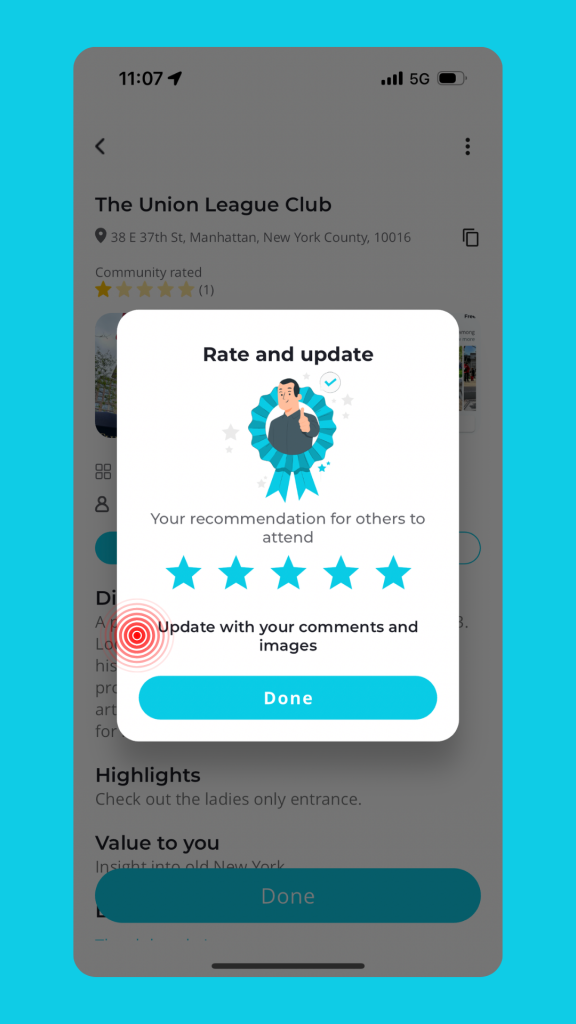
When user visits a POI, they can rate the location and post their review publicly. You can only rate a POI if you have been there and triggered the geo fence.
This means that people that review it, have actually been to the location.
Users can also share updates with up to three of their best images and comments, providing others with current information and setting accurate expectations.

MyPlan (Itinerary)
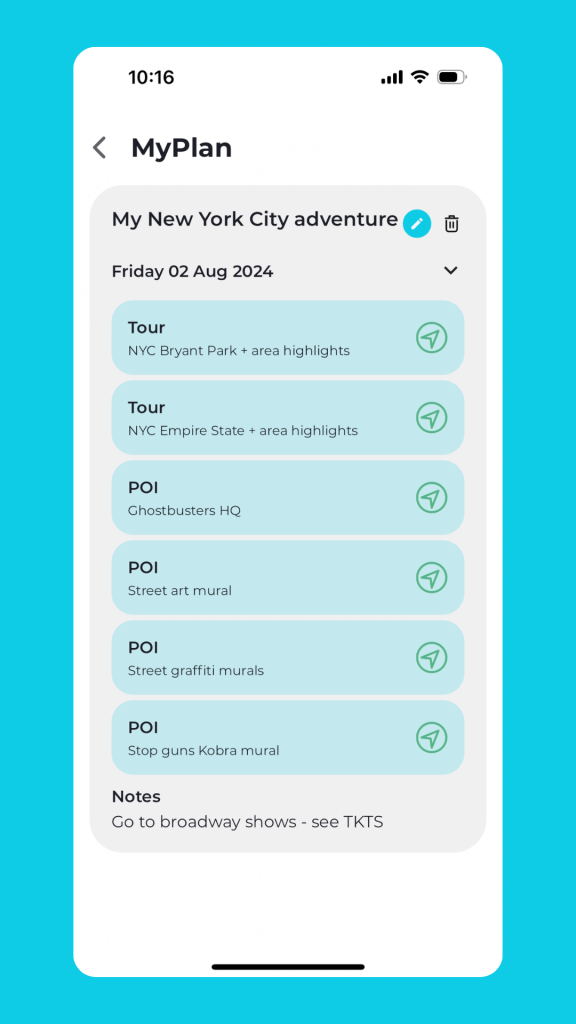
Create an itinerary so you don’t miss out on seeing what you want to see.
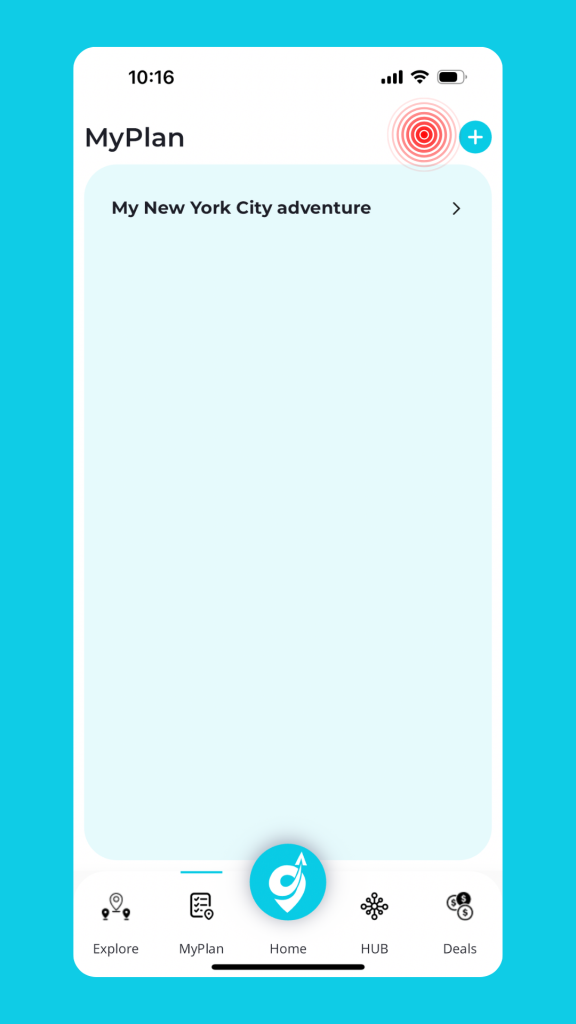
To create an itinerary, select the +.
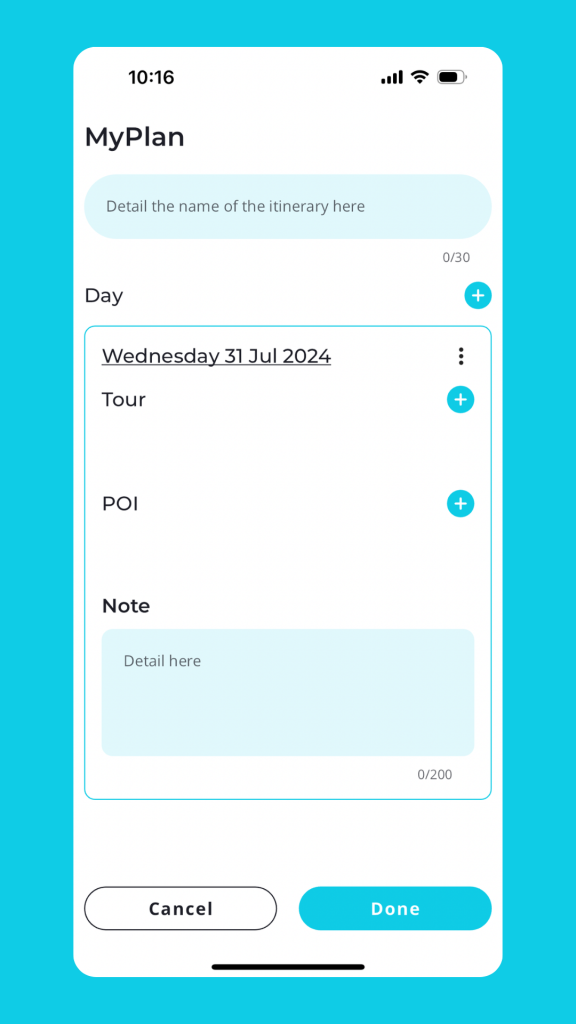
To add tours or POI, select the +.
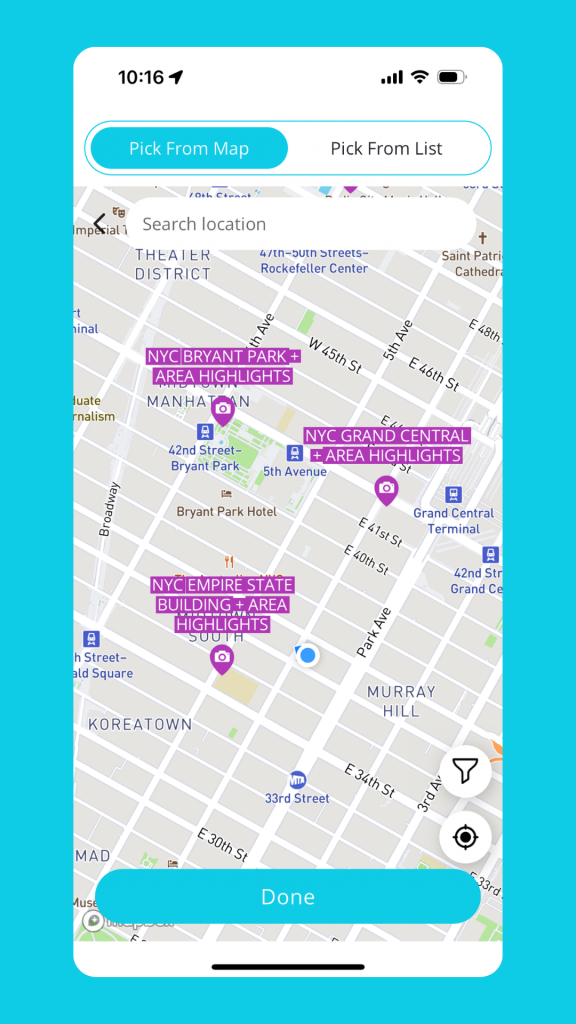
You can now select from the map or add from existing lists you have already added to your profile.
To start a tour, or navigate to a POI in the itinerary, select the play navigation icon.
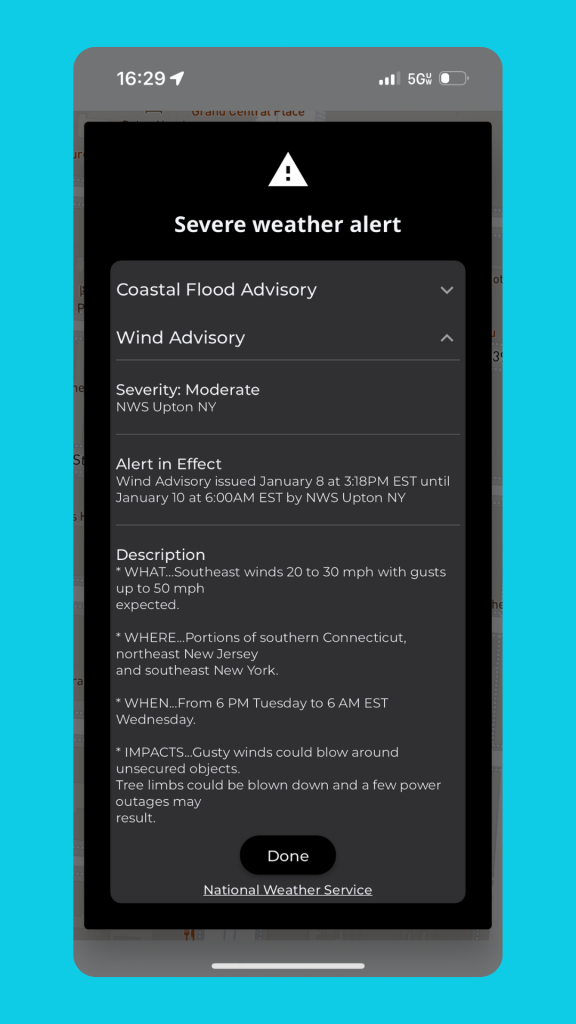
Severe Weather Alert (US Only)
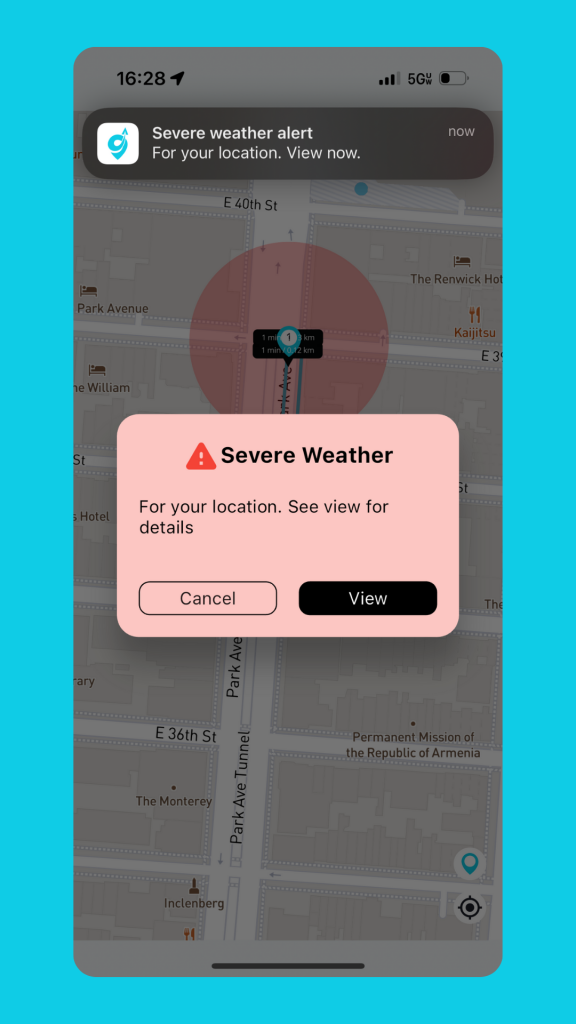
Get severe weather alerts when an active Tour or individual POI is underway (navigation and content access).
Get information on what is happening, how long for and what you can do to protect your personal safety or property.
Deals
Everyone loves a travel deal. So we’re developing this feature. Watch this space.
Safety
Safety when traveling is key. We have some great features we’re developing now. Watch this space.
Settings
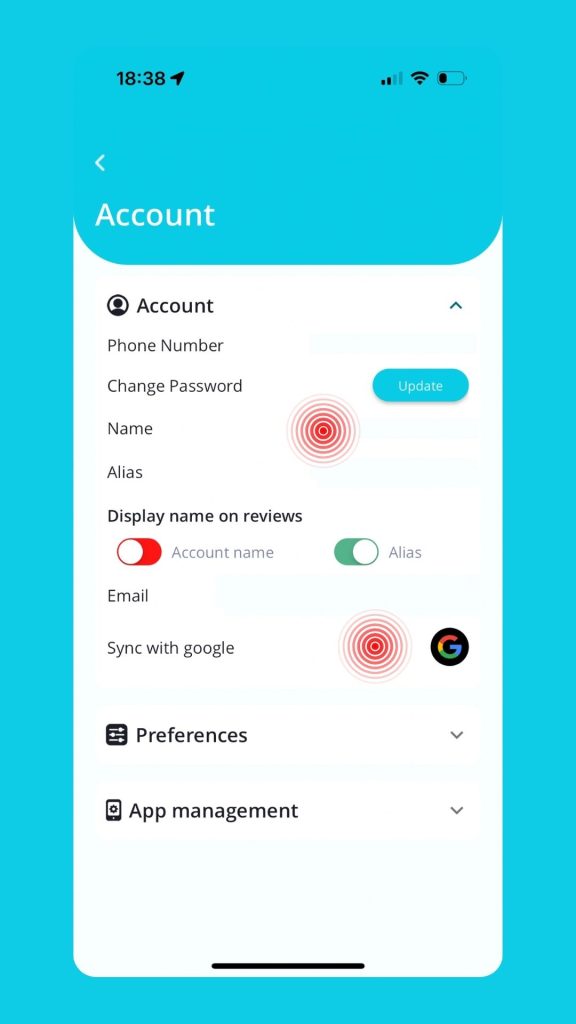
Account
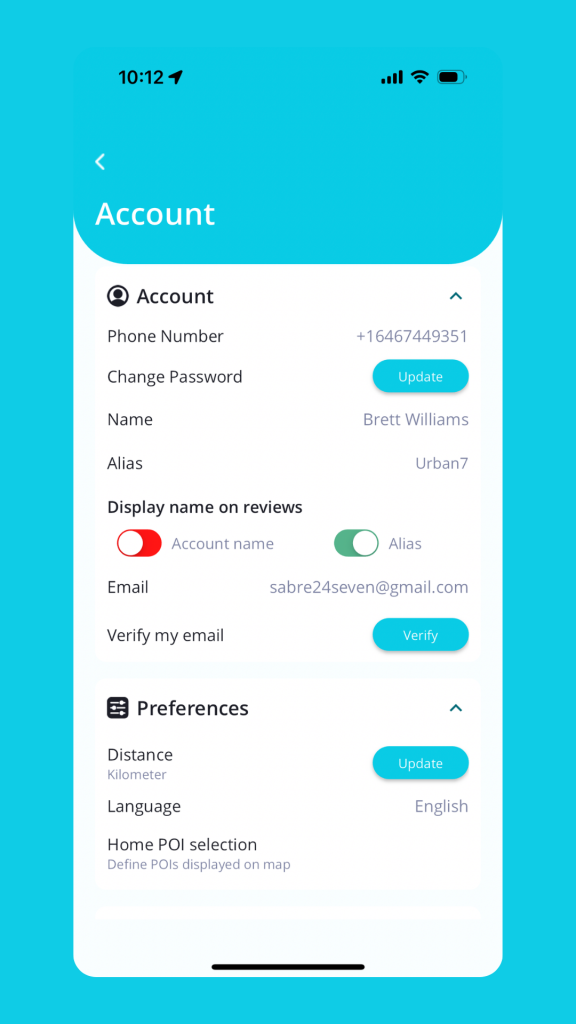
The account section allow you to:
- Edit your account name
- Add or Edit your Alias name. Some creators prefer to be known by their creator name for branding purposes
- Edit and verify your email address
- Set the language of app
- Unit of measure
- Change password or delete an account
Notifications
You have control over what and when you are notified. Our outlook is that we only send notifications because it’s important and supports your travels.
There are three types of notifications:
1 Tours
This enables you to be notified when you enter a geo fence.
2 Marketing
From time to time we may send you information on tours around that might appeal or may benefit you
3 Proximity
You can nominate when you are up to 500ft out from a Point of Interest or Pop Up. The notification distance is adjustable. This feature is important on a driving tour, as once you are alerted, you know to start looking for car parking.
Converting phone number Sign In to social login
Accounts created in the early phase of Ylore, used phone numbers as the user ID.
You can now Sign In using social logins: Apple or Google.
Go to Settings
Accounts
Connect the social login of choice
Update your account name
Next time you login to Ylore, use your social login.
Technology
Connectivity
A tour can be accessed online or offline. Online means that you are connected to the internet. Offline means that you are not connected to the internet.
For offline use, a user can access a tour and select [Download] in the top links. This means the contents of the tour will be available on your phone handset.
The directions, distance and time between Points of Interest and Pop Ups will be displayed, but not dynamically updated (as you are offline) as you progress through a tour.
Hardware requirements
A mobile phone handset.
Software requirements
Ylore operates on both Apple iOS or Android operating systems.
Updates
A user will receive update notifications from time-to-time. This includes new features and bug fixes. We recommended updating when prompted.
On selection of the [Update] prompt, you will be taken to the Apple Store or Google Play. Select [Update].
WIFI
Ylore works when connected to WIFI.
Cell network and WIFI
Ylore works with both the cell network and WIFI as they both lead to Ylore being connected to the internet.
Notifications
In Settings, a user can control notifications that are displayed. It is recommended that they are enabled, so you can be notified when timely information becomes available.
Viewing Notifications
To view a notification, select on your phone handset screen.
Proximity notifications
Be alerted when you are in proximity of a Point of Interest or Pop Up on a tour. As a user you can define when you want to be alerted, up to 1,000ft (305m). If you’re driving this gives you sufficient warning to park the car or make arrangements.
Notifications when network lost connection
Notification will continue to be displayed even when the internet connection is not available.
Navigation
When mobile phone location accuracy is low, it may take some time for the dynamic navigation to display. You will see a small colored loader in the top right hand side of the screen. Once connection has been re-established, navigation will display.
Screen refresh
Home screen is refreshed every five minutes when using the app. It will update sooner if you move away from the Home Screen and return.
Microphone privacy display icon on iPhone
On iPhone you may notice an orange dot next to the app. This is a privacy notification indicating that a microphone may be in use. It’s not. As part of our technology stack we use widgets, pre-designed elements to help build our product. In this case the content editor package uses a code strong to play audio, and this dependency uses a microphone API, which is detected by iOS/iPhone. Rest easy, we’re not listening to conversations, it’s against our privacy policy and not what we stand for.
Location access While Using App
For Ylore to work correctly when using a tour, your location needs to be accessed. Select [Only While Using App]. Your location is only accessed when using the app. No location tracking occurs.
Do not disturb
Do not enable Do Not Disturb features, otherwise POIs and Pop Up materials will not be displayed.
Volume silenced on cell phone
If you are unable to hear audio content, check the volume of your phone handset.
Blue icon on locked screen
This means you location is being accessed by a mobile application in use.
Logging in from another cell phone
Ensure that you log out of one phone before attempting to log into Ylore on a different phone. Only one log in is allowed at any one time.
Password reset when changing cell phone
Ylore allows you to log into any compatible cell phone handset, so long as there is only one active session at a time. When you change handset, you are channeled to reset your password, to maintain integrity.
Overseas travel
Ylore works wherever you are and there is an internet and cellular network connection. Note that data roaming charges may be applied by your cell phone provider.
Viewing the app
Ylore is optimised for portrait viewing on cell phones.
Location data sharing
Your location data is not shared with parties outside of Ylore, the owner AEGIS 24/7 or systems used to support the app. Your data is not sold to external parties. Your privacy is your privacy. We respect that.
Privacy
See Privacy Policy.
Support
Answer not found
If this help guide does not answer your question, send us an email to support@aegis-247.com.
Make sure to include:
- Your name and contact details.
- What action you were trying to do.
- The issue regarding app behaviour.
- Date/time the issue started happening.
- Suggested feature.
Do not terminate the app while in use
Do not terminate Ylore while in use. This terminates any feature you are using, including Tours or POI navigation.
Do not select DO NOT DISTURB
To provide a user with line of sight on the status of their tour, the ‘Do not disturb’ feature in a user’s phone should not be enabled.
Precise location accuracy
Ylore needs your precise location to provide you with information when using and searching tours.
It is strongly recommended that in Settings, your location accuracy is set to Precise.
Online map viewing pitch
To adjust the pitch or viewing angle, place two fingers on the screen and move them simultaneously upwards or downwards, depending on the pitch angle desired.
On screen prompts
In Ylore prompts are displayed because we need your permission to undertake an activity.
In line with our commitment to you, we don’t request unnecessary actions unless it’s needed for the app to work correctly.
Prompts that are displayed:
- Notifications: To enable information notifications regarding a location.
- Location access – general: To view your location on the online map when using the app.
- Location access – ‘While using App.’
Content not displaying correctly
If you have Accessibility features enabled so you can view text and display content at a larger size than standard, some of the app content may not display correctly.
Notifications when network lost connection
Notifications will continue even when cellular network or WIFI connection has been lost. This is so you have line of sight on your tour.
Location access ‘While Using App’ when using a tour
When creating an account, ensure you provide location access to Ylore. Select [While Using App] so the app functions as intended.
Volume silenced on cell phone
To enjoy content at Points of Interest or Pop Ups, enable volume.
Blue icon on locked screen
The blue icon in the top left hand side indicates that the app is using Location Services. This only occurs when a tour is in progress.
Password reset when changing cell phone
Ylore allows you to log into any compatible cell phone handset, so long as there is only one active session at a time. When you change handset, you are channeled to reset your password, to maintain integrity.
Lost connection
If there is no network connectivity, an error message will be displayed.
A tour will re-commence once you reestablish your cell phone signal.
Impacts on location accuracy
The accuracy of your location on an online map, may be affected by:
- interference from buildings and the environment.
- indoor or underground use.
- cell provider service.
- atmospheric conditions.
- user handset.
Languages
The app is available in a range of languages. On creation of a Ylore account, select your language of choice. This language selection will cascade to tours i.e. you select French when creating an account, tours will be displayed in French. This can be changed on each content module if need be.
Not all languages may be available for all features. This is because we use third party services that may only support large global languages.
Change password
To change the account password, go to [Settings].
Select [Account].
Select [Change Password].
Input the old password, create a new password and confirm it.
When signing into the app next time, use the new password.
Logging out of account
Select [Settings].
Select [Log out].
Deleting account
To change the account password, go to [Settings].
Select [Account].
Select [Delete Account]
A confirmation prompt will be displayed.
If you [Delete Account], all settings and data will be removed.
Contact us
Contact us at support@yloretravel.com
Detail:
- What action you were trying to perform
- Where you were in the app
- What the issue was
Security
Security
Phone number used for sign up
If you chose not to use the Social Login feature, you can use your phone number. Don’t worry, we don’t use it for any other purpose other than account creation/sign in.
When using a phone number, we use Two-factor authentication (2FA), is a security process in which users provide two different authentication factors to verify themselves.
Ylore requires during account set up, a user to detail their cell phone number and then input the security code provided by SMS, to verify they are in possession of the phone.
SMS issued from a fixed phone number
Verification SMS are issued from a fixed phone number.
Personal information requested
Ylore only asks for and securely stores information that is needed. This includes:
- Full Name and/or your Alias Name (creator name): To identify who you are when publishing tours or sharing tours with others
- Cell phone number: For security purposes
- Email: For account verification, Stripe updates, product updates, marketing updates
- Social media links: These are optional for creators when developing a tour, so people can follow them on social media.
Forgotten password
On the [Sign In] screen, select [Forgot password].
Enter the cell phone number associated with your account and we’ll send an SMS with a link to reset your account.
Data security
We believe in security by design. Just some of the ways we do this is:
- Encrypted data at rest and in transit between the app and our support systems.
- Encrypted storage of your data on cloud based servers.
- Adopting ISO27001 Information security management risk principles.